Memphis Rubbed Lollipop Drumsticks

20140615_182143

Lessons Learned:

  • I need to sharpen my kitchen shears
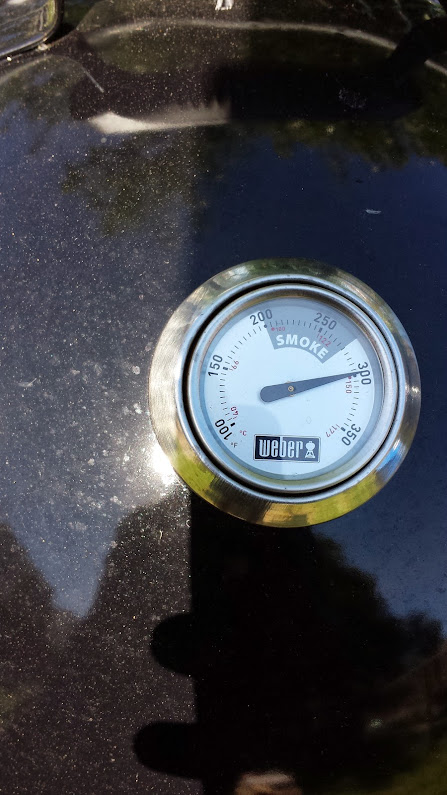
  • Monitor temps on the smoker better
  • Next time I will dip the bone as well for a better sheen/presentation
  • Maybe invest in a drumstick holder for more uniform appearance

Skill Level: Beginner/Intermediate

I got this recipe from my man Malcolm at HowToBBQRight. If you want to take your BBQ to the next level, he’s got all kinds of videos, tips, tricks, etc. Pretty down to Earth guy too.

As always, I started by mixing my rub together. This is a standard recipe that I go to often. Mix it up real good. You can apply it with your hands or a good shaker bottle if you have one. I prefer sprinkling and rubbing it with my hands. And as I always say, “Rubbin’ Son, is Racing!”
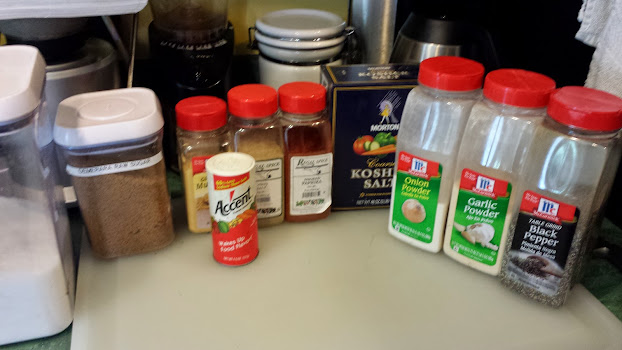
Memphis Rub Recipe:

3/4 cup raw sugar
3/4 cup white sugar
1/2 cup smoked paprika
1/4 cup garlic powder
2 tbsp ground black pepper
2 tbsp ground ginger powder
2 tbsp onion powder

Skinning the legs:

With a sharp knife, cut down to the bone just under the knuckle end of the drumstick. Be sure to cut through the tendons and connective tissue to the bone. Once you are done you are going to pull the skin and cartilage up and over the knuckle. I found it easier to use a paper towel to grasp the skin and pull it off. Once done, push the meat down as far as you can toward the other end of the bone. When the chicken cooks, the meat is going to shrink down the bone and gather at the meaty end. Here is where having dull kitchen shears made the job of snipping the tendon so frustrating. I ended up going with my large Chef’s knife to get the job done.


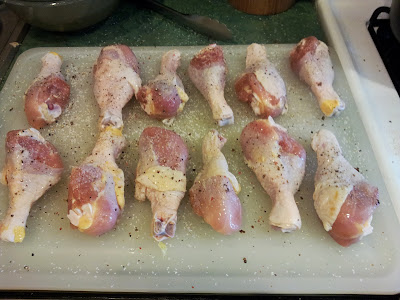
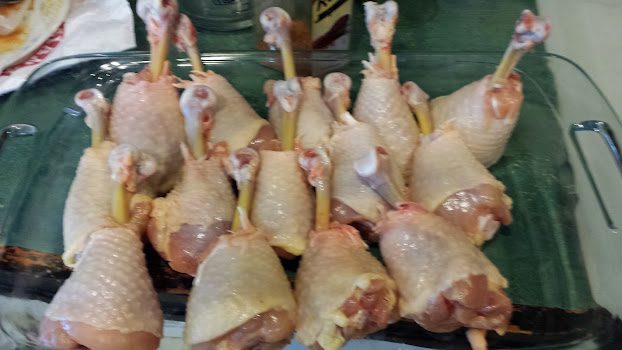
Skinned and ready for wrapping:

Here is a shot of all the legs with the skin and cartilage pulled off ready for wrapping.
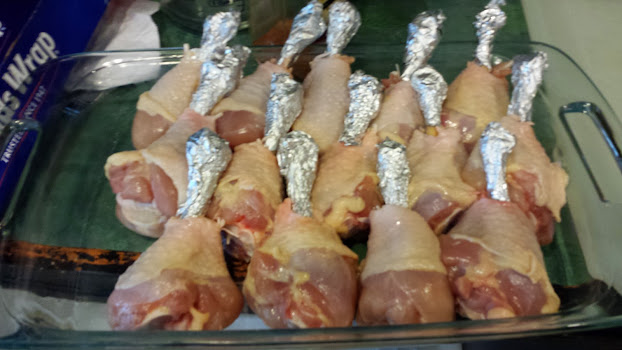
 

Bone ends wrapped…

One of Malcolm’s tips is to wrap the bone ends in aluminum foil. This keeps the bones from turning black from the smoke and heat. This is for cosmetic purposes only. I’m sure they would taste fine without it. I just took a small piece of aluminum foil and wrapped the ends prior to applying the rub.


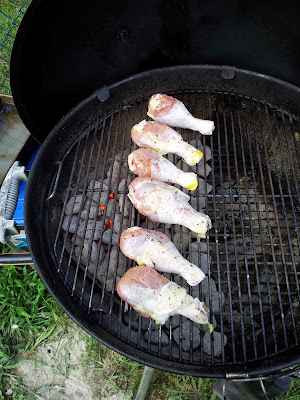
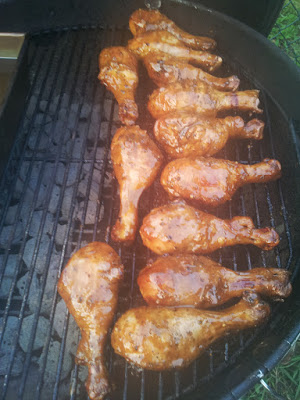
Wrapped, rubbed, and going on…

Here’s a shot of them going only the smoker. I didn’t have a drumstick holder and my pan was a bit too large to get them to stand vertical without some help. So I used some skewers and threaded it through the drumsticks. I melted a stick of butter in the bottom of the pan to give the drumsticks additional flavor during the smoke.


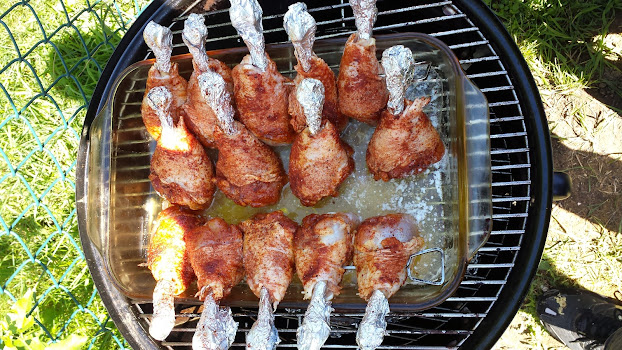
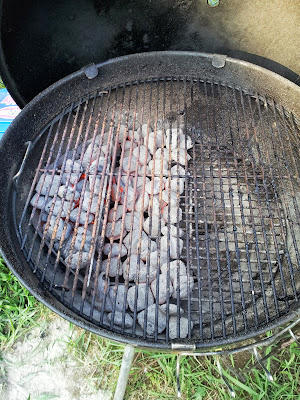
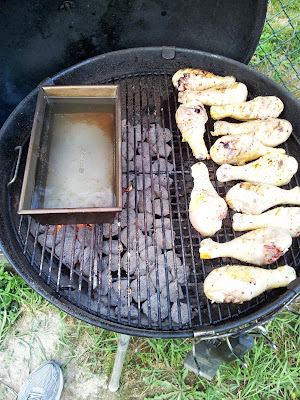
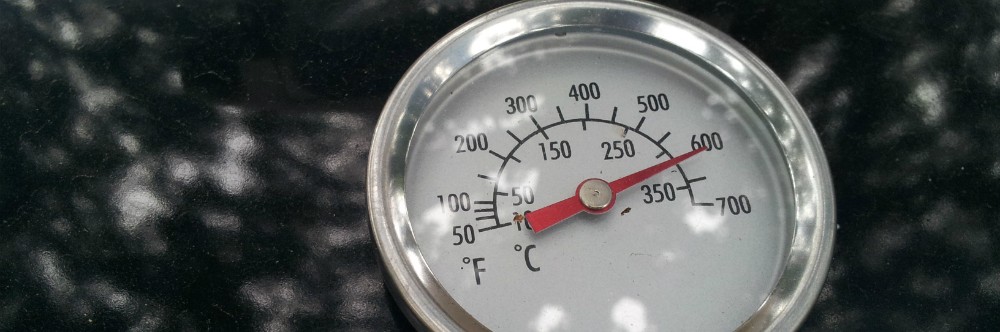
Smoke/Roasting at 300 degrees for 2 hours…

One of the reasons I love my Weber is that it will hold steady without any help. IF YOU KEEP AN EYE ON IT! I used one Weber Chimney of lit Kingsford coals, and another half of unlit on top. Since I was shooting for a cook in the 2.5 hour range I wanted to make sure I had enough heat. I lined the water pan but did not fill it. Although you can’t see it in the above picture, I have a rack of bratwurst on for my boys as well. I added 1 block of Cherry wood per hour to the cooker to keep a steady smoke but not too overpowering. Once the smoker approached 275, I closed two bottom vents and left one open 100%. As always I left the top vent open 100%. I checked the temp every 30 minutes. First hour I was fine, Second hour temps begin to drop too fast and I had to open all the bottom vents to 100% to recover. Ten minutes later the temp was back where it needed to be. I’ve since ordered the Maverick 732 Remote BBQ thermometers to help me keep a better eye on temps when I’m inside the house.


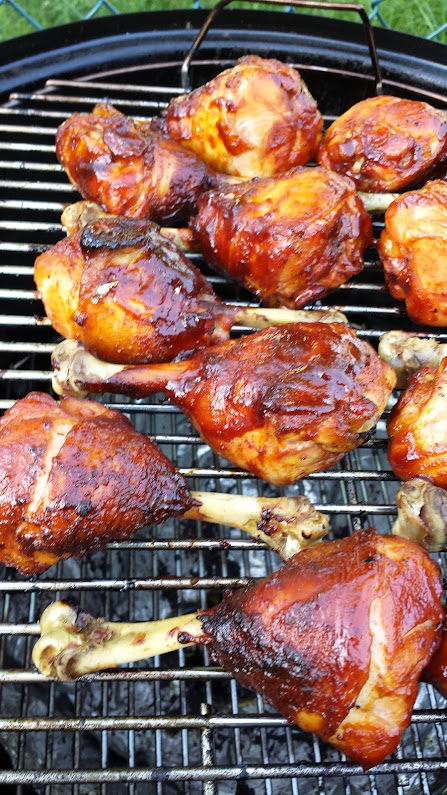
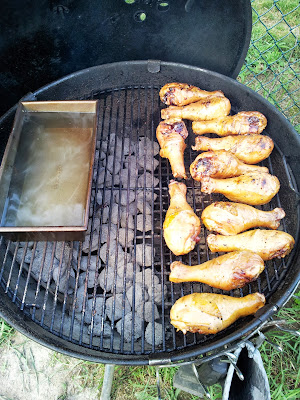
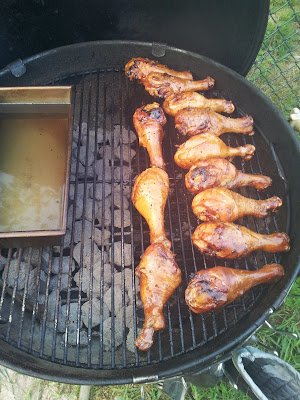
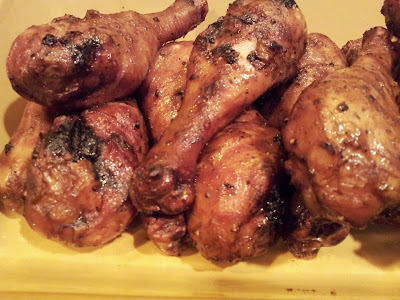
Putting on sauce at 2 hour mark…

At 2 hours the legs were ready for the sauce. I brushed them with a 50/50 mixture of Sweet Baby Ray’s and Honey. After giving them a good coat, I put them back on for 30 minutes to tighten up the glaze a bit and let it caramelize. This is a shot after 30 minutes of glazing. Overall a good cook, and the family enjoyed them. So if my boys will eat it, it has to be good!

Apple Roasted Honey Drumsticks

IMG_20130912_140752

After the less than stellar outcome with the Butterflied Turkey I wanted to do something easy with this cook. So I figured I would go back to a basic, drumsticks. I recently bought a new grill cookbook, Myron Mixon’s Everyday Barbeque and was dying to try the brine recipe in it.

Lessons Learned:

  1. These could have been fine smoke roasted in the 325-350 range. They didn’t need to have the slow and low treatment that a roast would need.
  2. A continuous supply of Apple chips was the perfect amount of smoke.

IMG_20130912_090133IMG_20130912_090125

Brine: I used Myron Mixon’s apple juice brine, and brined the drumsticks overnight.

Brine Recipe: (enough for 2 1 gallon freezer bags)
  • 6 cups apple juice
  • 2 cups apple cider vinegar
  • 1.5 cups sugar
  • 1.5 cups kosher salt

IMG_20130912_090430

Drumsticks fresh out of the brine and being toweled off…

IMG_20130912_091523

My favorite part, applying the rub…

Rub Recipe:
  • 1 cp. light brown sugar (packed)
  • 2 tbsp. chili powder
  • 2 tbsp. mustard powder
  • 2 tbsp. onion powder
  • 2 tbsp. garlic powder
  • 2 tsp. cayenne pepper
  • 2 tbsp. Kosher salt
  • 2 tbsp. black pepper

IMG_20130912_091816

Drumsticks all rubbed up and resting. My kids, who don’t like anything with spice or flavor, actually requested some “blank” drumsticks. No rub, just smoke and sauce!

IMG_20130912_102703

For this cook I went for a slow and low setup with about 3 hours of fuel. I have a continuous ring of Apple chips on top of the coals. This should get me a nice steady stream of smoke but not too much to overpower the meat with a sooty taste.

IMG_20130912_130329

For the sauce I went with a straight 2:1 mixture of Sweet Baby Ray’s and Raw Honey. Heated and mixed together. I mixed this about 2 hours before using.

IMG_20130912_133545

This is what the Chicken looked at the 2 hour mark. You can see that the ring of coals and chips have burned through half of the fuel. The grill was in the solid 225-250 range. A bit lower than necessary for chicken. But since this was going to be a long smoke I had plenty of time and fuel.

IMG_20130912_133641

I went ahead and added some sauce on the drumsticks. And left them on for about 30 minutes more. I ended up not having to go the entire 3 hours at all. Temps on the drumsticks at saucing were at 160.

IMG_20130912_140752

Close up after applying sauce:

IMG_20130912_193055

I pulled the chicken off, gave another coating of sauce, and covered with foil and let sit for 30 minutes. These were so good, and fall off the bone soft! A couple didn’t even make it to the photo shoot. Sacrificed to Cook’s Privilege! The apple wood left a mild taste, more subtle than cherry. It was a great compliment to the brine!

Hong Kong Chicken

I picked this recipe from Weber’s Charcoal Grilling: The Art of Cooking with Live Fire last week, because I wanted something on the grill, but didn’t feel like going out to the store to pick anything up. So I defrosted some chicken legs the night before and set to preparing this. This is a relatively quick recipe to prepare for. Total time from unwrapping thawed legs to plate was about 5.5 hours. The majority of that time (4 hours) was the brine time for the chicken legs.

Let’s move on to the cook!

Dry Ingredients Wet Ingredients

Seasoning Blend:

2 tsp. Kosher salt

1 tsp. fresh ground black pepper

Brine:
2 qts water
1/2 cp. Kosher salt
1/2 cp. sugar

Grill Sauce:
2 tbsp. Hoisin Sauce
2 tbsp. Cider Vinegar
1 tbsp. Dijon mustard
2 tsp. Soy sauce
2 tsp. grape seed oil
1/4 tsp. fresh ground black pepper

This cook, is brought to you by Bacardi White

Step 1: Brine the chicken for 4 hours in the brine mixture and place in the fridge.

Step 2: Remove chicken from brine, rinse off, and pat dry with paper towels. Then liberally season with seasoning blend.

Step 3:

Set up a medium heat grill. I used 3/4 of a Weber chimney full of Kingsford coals. I filled one Weber basket with lit coals, and then poured the rest to cover half the charcoal grate. (see below)

Step 4: Place chicken directly over coals for a 5 minute char to get the drumsticks started. (2.5 minutes on one side, then 2.5 minutes on the other)

Step 6: Move to cool side of grill

Step 7: After 20 minutes

Step 8: After 40 minutes

Step 9: At 40 minutes, apply sauce to chicken and put the lid to cook for an additional 20 minutes

Step 10: Last 20 minutes

Step 11: Pull and let rest for 15 minutes. I made some sautéed vegetables and brown rice with a Moscow Mule. Excellent! Chicken had a bit of heat to it, a little too much for the kids, but me and the wife loved it!

Cherry Roasted Thighs and Brats

IMG_20130101_172726IMG_20130101_152809

It’s the first of the New Year and I had to create a bit of Summer. Right now it is 35 degrees, grey, and a bit dreary here in Philly. But that doesn’t have to stop me. Mind you, my wife and neighbors are sure I’m insane. Besides, its been a couple of months since I’ve been able to grill. Let’s see Hurricane Sandy, an unnamed storm, traveling to Detroit and Chicago for work,  a couple of bouts with some good chest colds, and voila!, There goes your time.

Official sponsor of today’s cook

IMG_20130101_141938

Winter in Philly…

IMG_20130101_134551

So as before, let’s get started with the players:

Dry ingredients for rub: Wet Ingredients:
3 tbsp Paprika
1 tsp Garlic salt
1 tsp Onion powder
t tsp Coarse black pepper
3 tbsp Brown sugar
Potato Rolls
Johnsonville Bratwurst
12 chicken thighs
2 tbsp EVOO

Since I only thought of barbequing this morning, I didn’t have time to brine the thighs, so I used this basic rub and let it sit for a couple of hours while I grilled some bratwurst and potato rolls. Also, I will do a complete slow and low cook without starting the chicken directly over the coals first. This way they get a chance to absorb as much of the cherry smoke as possible.

I rubbed the thighs with the EVOO first then liberally sprinkled and rubbed in the dry rub. The rub is very basic so go with as heavy as a hand you like.

IMG_20130101_142237

The temperature outside is a bit on the cold side, 35 degrees and about 10 mph wind. So I don’t have to worry about temps getting away from me at the beginning of today’s cook. I lit one full Weber chimney of coals that I split between a weber basket and the rest heaped against the other side of the kettle.

This allowed constant heat for the cast iron griddle for the onions, mushrooms, and green pepper, as seen below. I used a bit of smoked sea salt and dried porcini mushrooms while cooking the vegetables.

IMG_20130101_143552

After about 30 minutes:

IMG_20130101_151722

Best Potato Rolls in Philly!

IMG_20130101_140711

Toasting the potato rolls:

IMG_20130101_151958


PART II: Thighs

During the brats, the temperature of the kettle wavered between 350 and 300 degrees. About an hour into the cook I added 20 unlit briquettes on top of the burning coals and gave it ten minutes to catch. I poured out the basket onto the side as well as I wouldn’t be needing it for the chicken

At about 30 minutes later in I added in 15 additional unlit briquettes to ensure I had enough heat for the planned cook time of 1:45 minutes totals.

Final Pics of Thighs

IMG_20130101_172707

Thighs came off and were perfect. Meat fell off the bone. They went great with a 1:1 mix of Sweet Baby Ray’s and Srirachra Chili Sauce.

Crispy Pastrami Wings

IMG_20121027_183644

After my recipe regarding the crispy grilled chicken breasts, I decided to work on a similar recipe for wings. But the past 3 weeks have been a bit hectic here in Philly; a trip to DC for work, then Hurricane Sandy, then I caught a nasty cold during the Hurricane, and now a Nor’easter is blowing through with rain and snow tonight. So, since I had this recipe on deck the week before all of this started, I’m finally posting it.

This is a variation of a recipe from Chef John of AllRecipes.com. His stuff is usually pretty good. I had no problem changing this and adapting it to my purposes. Let me give you the run through and play by play.

The Line Up:

IMG_20121027_171543

The Dry The Wet
  • 1/2 tsp. white pepper
  • 2 tbsp. ground black pepper
  • 3 tablespoons ground coriander
  • 2 tablespoons paprika
  • 4 tsp. kosher salt
  • 2 pinches chili pepper (Aleppo is what I used)
  • 4 tsp. corn starch
  • 24 chicken wings, separated at joints. (tips thrown away)
  • 2 tbsp. olive oil

Step 1: Mixing the spice rub

IMG_20121027_172039

Add all the dry ingredients (except the corn starch) together in a small bowl and mix thoroughly. I used a small whisk to mix and blend the ingredients together. Nothing like a bowl of freshly mixed spices!

Step 2: Splitting the wings

IMG_20121027_172719

Here I’ve split the wings into the drummettes and flats. I’ve tossed the tips, as I never really use those for anything. Some people like them I guess, but as for me, NOPE! I’ve lightly coated the wings with olive oil and rubbed them down with my fingers.

Step 3: Season with the spice rub

IMG_20121027_173640

In this shot I’ve just begun seasoning the wings from above. I usually take a few fingerfuls of spice mixture and “Make it Rain” from above. With this recipe you’ll season the wings twice. So be sure to make sure you pace yourself with the rub so you have enough to last 24 wings twice. I just flipped these in the bowl a few times and they were evenly coated.

Step 4: Adding the corn starch

IMG_20121027_174156

Here I’ve lightly sprinkled some of the corn starch on this set of wings. Since I’ve cut back on my consumption of wheat I needed something to take the place of the flour in Chef John’s recipe. In my previous recipe I used ground rice to give a bit of “crunch”. The ground rice was able to stand up to the direct heat well. But since I’m cooking these indirect I wanted to see if the corn starch would perform as well as all-purpose flour as a binding agent. Toss or stir these well to coat with the corn starch. Once finished…

Step 5: A Final toss…

IMG_20121027_173857

Here’s what the wings look like with the final coating of spice and one last toss session.

Step 6: Cook ’em!

IMG_20121027_183419

Cook these at a medium-high heat 400 to 425 range worked for me fine. I used some parchment paper to keep them from sticking to the pan. 20 minutes into the cook, flip them over and cook on the other side. In the picture above you see them just as I was about to bring them to the kitchen. Let them rest for about 10 to 15 minutes. The juices will re-distributed and the skin will crisp up a bit.

Step 7: Hide ‘em!

IMG_20121027_183644

These were unbelievably good! I’ve since made them twice since I first tried this recipe and have been able to produce consistent results with them. The whole family blew through these in about 2 days. But it was well worth it!

Try ‘em out and let me know what you think!

Crunchy Grilled Chicken Breasts

IMG_20121007_140655

Tell me these don’t look good, I dare you! Just kidding. Smile

It is possible to make crunchy and grilled chicken breast at the same time on the grill. This isn’t KFC styled crunchy but there’s a good bit of attitude in each bite of these. This cook is a variation of a recipe in  Bill and Cheryl Jamison’s Chicken on the Grill: 100 Surefire Ways to Grill Perfect Chicken Every Time

Today in NE Philly

P1010414

As you can see the sky was grey and drizzly, a dreary Sunday afternoon brewing up. Plus, the weather was under 60 degrees so you know what that means, Summer has officially left the building. Doesn’t mean I can’t grill though.

Today’s cast:

P1010405

Dry Ingredients Wet Ingredients (Basting blend)
  • 4 tbsp raw rice (ground to consistency of bread crumbs)
  • 2 tbsp paprika
  • 2 tsp kosher salt
  • 1 tsp brown sugar (always homemade!)
  • 1 tsp onion powder
  • 1/4 cup EVOO
  • 1/4 cup unsalted butter melted
  • 1/4 cup roughly chopped fresh herbs (Basil, Oregano, Marjoram, etc)
  • 5 cloves crushed garlic

Grinding the Rice

P1010406

At first I tried my tried and true Cuisinart food processor. But after a minute or so of pulsing this is what the rice looked like. I was not looking forward to digging out my marble mortar and pestle. So I got down my Oster blender. Here’s a shot of it grinding away. Look at that rice fly!

P1010407

Ground rice anyone? As you can see it is ground to about the texture of bread crumbs. The blender really made short work of the rice. If I had left it on for much longer I probably would have had rice flour.

P1010408

The resultant rub:

P1010409

It’s Hammer Time! I hate pounding chicken breasts. One tip I’ve found is to use a freezer bag for the chicken breasts and whack them while inside. The freezer bag is a lot easier to get chicken in and out of then Saran Wrap.

P1010410

…and Rubbin’ son, is Racing!

P1010413

I’ve given each breast a liberal coating of the rub. They will go in the fridge for 3 –4 hours as I get some other things done today.

4 Hours later…

P1010415

I’ve got my trusted Half-Moon Griddle on my Weber One-Touch-Gold. I only lit a 3/4 full chimney. Knowing how fast breasts cooks I didn’t need a full chimney today. Plus I wasn’t going to cook anything else after this. Underneath the griddle is a weber basket full of coals. The rest of the chimney was spread out halfway across the charcoal grate.

3 minutes per side…

P1010416

I cooked each breast three minutes per side. As soon as I flipped, I brushed on the basting marinade on top of the sizzling meat. As soon as 6 minutes had passed I moved the breasts off to the cool side of the grill as I cooked the other breasts.

Basting Beauties…

P1010417

Here you can see my phone playing double duty as a timer for the breasts.  I can get a bit anal about these things sometimes. The basil baste is in the center of the photo.

A group shot…

P1010418

Last of the chicken breasts going on the griddle. You can see some of the herbs on some of the other pieces. One of these breasts never made if off the grill and into the house. He sacrificed himself by jumping straight into my mouth!

The heat is on…

P1010419

Once all the breasts had their 6 minutes of fun, they went back over the hot coals for 3 more minutes. I basted and flipped after about a minute each side. The smell of the baste on top of the sizzling meat chased the Autumn away.

The Money Shot…

IMG_20121007_140702

The chicken came out great. The ground rice in the rub was a nice surprise. It gave the breasts a bit of a bite as you bit into them. Almost like coarse sea salt but without the salty taste. Next time I make this rub I make increase the amount of ground rice a bit. But overall I’m very satisfied with this outing.

White Barbeque Sauce

I’ve been wanting to try my hand at “White Barbeque Sauce” ever since I first saw it in featured in Jamie Purviance’s cookbook Charcoal Grilling: the Art of Cooking with Live Fire. The recipe is pretty straight forward. And of course I’ve modified it a bit. Here are the players:

The Dry The Wet
  • 1 tbsp. sugar
  • 1 tsp. Sea Salt
  • 1 tsp. coarsely ground black pepper
  • Large Yellow Onion
  • 2 garlic cloves
  • 4 tbsp. unsalted butter
  • 1/2 cup dry white wine
  • 1 cup Miracle Whip Dressing
  • 1/3 cup loosely packed, rough chop basil
  • 1/4 cup Apple Cider vinegar
  • 2 tbsp. lemon juice
  • 1 tbsp. Dijon mustard
  • 1/2 tsp. hot sauce

IMG_20120930_151526

Step 1: Here I’ve minced the garlic & onion until they were basically a paste. I ended up straining this mixture as there seemed to be a lot of liquid left over. Since I was going to be sautéing this mixture I didn’t want it too wet.

IMG_20120930_152240

Step 2: In this shot, I’ve melted the butter and have begun to cook the onion mixture. It took about 4 minutes. I cooked it until it was just starting to turn opaque; stirring occasionally.

IMG_20120930_154609

Step 3: Next I added in the white wine and cooked until half of the liquid evaporated out of the mixture. This took about five minutes at a good rate of simmer.

Step 4:  Remove from heat and let the onion/garlic/white wine mixture cool for about 5 minutes. During that time you can assemble the remaining ingredients

Step 5: One the mixture has cooled whisk in the remaining ingredients. My sauce had the consistency of lumpy ranch dressing. But man, did it taste better than any ranch dressing I’ve ever had. You could probably use this as a dip for other things besides a sauce for grilled chicken.

IMG_20120930_160403

Step 6: Cover and refrigerator for about 1 hour before serving. If grilling chicken, brush on the White BBQ sauce onto the pieces about 10 – 15 minutes before they are due to be pulled from the grill. I’ve included a shot of what the chicken will look like after cooking with the sauce in the pic below.

IMG_20120930_173043

Try it and let me know how it comes out.

Butterflied Smoked Chicken

For this cook, I am started with a standard Perdue fryer. I need to find a good Amish butcher so I can get some organic free range birds to play around with. My local grocer stopped selling organic Kosher so I have been using Perdue birds.

IMG_20120901_213159

Here you see I’ve cut through the back of the chicken to one side of the backbone. When I butterfly I usually leave the backbone in, vs cutting it out. There is some decent flavor that gets missed when you pull the backbone out.

IMG_20120901_213443

Here the bird is flipped over and you can see where I left in the backbone on the left side. Next step is removing the keel. Which I will show in the next shot.

IMG_20120901_213511

After spreading the two halves of the bird, I position a sharp chef’s knife against the upper edge of the keel as in below. Using a slight cutting motion the blade will cut a small indentation into the bone. Once done, spread the bird with slight pressure and the breastbone will split. Then run your finger along the underside and pull the whole thing out in one shot.

IMG_20120901_213534

Here is a picture of the bird after the center breast bone has been pulled out.

IMG_20120901_213723

I flipped the bird over and cut two small slits in the lower part of the breast halves to tuck the drumsticks in as in the below picture. I season with rub with the drumsticks untucked then tuck them back in before I place on the grill.

IMG_20120901_213848

Applying some rub. My basic recipe is as follows:

Wet Ingredients Dry Ingredients
  • Rinse bird with water (dry with paper towels)
  • sprinkle with 2 tbsp lemon juice lightly rub all over bird
  • 4 tbsp kosher salt
  • 2 tbsp paprika
  • 2 tsp dried chipotle pepper
  • 2 tsp brown sugar
  • 2 tsp garlic powder
  • 1 tsp celery seed
  • 1 tsp ground cumin
  • 1 tsp black pepper

IMG_20120901_214324

Going on the grill with some spare thighs I had leftover from an earlier cook.

IMG_20120902_162250

Not too bad if I do say so myself. I pulled the thighs off earlier than the butterflied bird as they were finished sooner.

IMG_20120902_182659