Apple brined Cherry Roasted Butterflied Turkey

IMG_20130901_183816

The outcome of this recipe was a bit of a let down. I think I dropped the ball in execution of the final roast/smoke. It tasted good and was very flavorful, but I wanted a butterflied bird with deep crisp mahogany skin and juicy flavorful meat. As you can see from the pic above not all of the bird came out perfect. Now the meat was juicy, but I think the air was too humid, and in my rush to get the bird onto the grill, I sacrificed some crispness in the skin. Much to my dismay, my family pulled the skin off and left it in the plate. = FAIL!

Lessons learned:

  1. Brine for full 24 hours, not just 18
  2. Only 1 water pan in the grill area, not 2
  3. Let bird air dry in refrigerator for 24 hours

Let’s get on with the play by play.

IMG_20130831_191725

This cook is sponsored by my favorite beer of all time! Sam Adams Octoberfest!

IMG_20130827_074538

I took this 13 lb turkey out of my freezer to thaw in my refrigerator on Tuesday. The bird wasn’t ready to work with until Saturday.

IMG_20130831_192438

Ingredients for the Apple Brine
2 quarts apple juice
1 pound brown sugar (light or dark)
1 cup Diamond Crystal Kosher Salt*
3 quarts cold water
3 oranges, quartered
4 ounces fresh ginger, unpeeled and thinly sliced
15 whole cloves
6 bay leaves
6 large garlic cloves, peeled and crushed

* Substitute 3/4 cup Morton Kosher Salt or 1/2 cup table salt for Diamond Crystal.

IMG_20130831_192851

Pouring in the apple juice…

IMG_20130831_193633 IMG_20130831_193926

IMG_20130831_194154 IMG_20130831_194347

Squeezing lemons, crushing garlic, slicing fresh ginger root, and stirring in all up….

IMG_20130901_142540

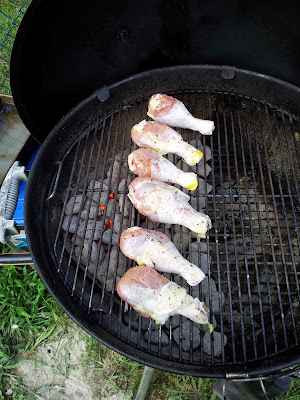
The turkey going for a dip… I only brined it for 18 hours,  I should have done a full 24. But with me losing a day not pulling the turkey out of my deep freezer earlier I didn’t want to be pulling this off my grill at 11 Sunday evening, so I cut it short by 6 hours.

IMG_20130901_142947

18 hours later, I’ve rinsed the bird and patted it dry with paper towels. Just going after the last few stubborn feathers with the first pair of pliers I found laying around.

IMG_20130901_150340

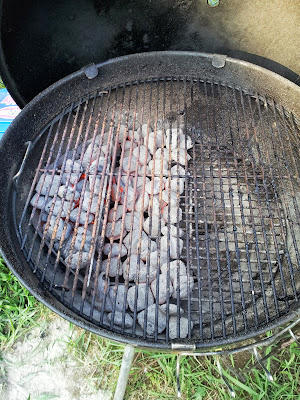
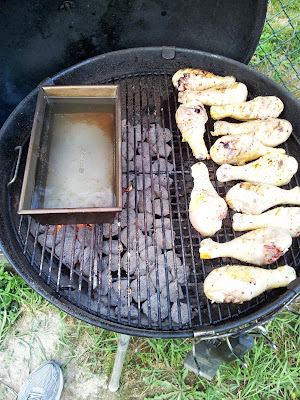
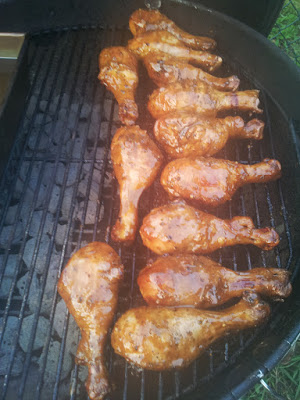
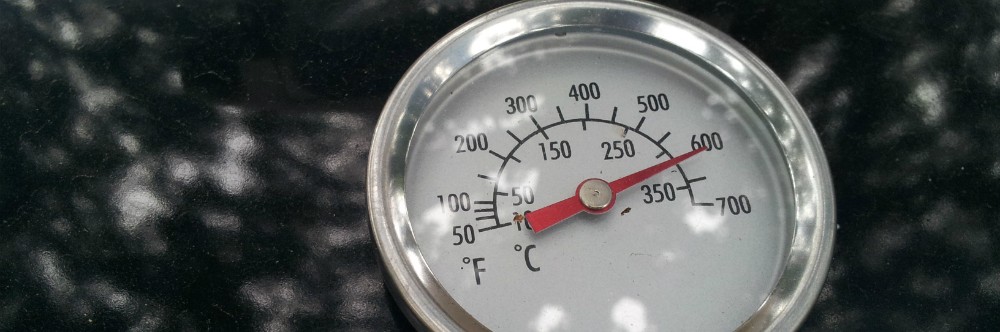
Instead of the usual slow and low, I set my grill for a slow and high configuration. Looking to get a solid 300 –350 degree ranges for 2.5 to 3.0 hours. The 2 bricks allow for more coals on the side, and the added benefit of radiating the heat toward the rest of the grill.

IMG_20130901_152110

In addition to the drip pan under the turkey, I grabbed a spare pan to provide additional moisture to the side. Hindsight, this secondary pan probably made it too moist. Also, I don’t think I used enough wood chunks. Although the bird had a smoke ring, it was very light.

IMG_20130901_153146

The butterflied turkey splayed out, rubbed with a couple of tablespoons of a generic poultry blend I had purchased. <- Again mistake, I should have mixed my own blend and not taken the lazy way out. Do you see a pattern yet with these mistakes? I rushed my own barbeque and wasn’t satisfied with the results. Shocker!

IMG_20130901_153344

Butterflied turkey barely fitting in the remaining space on the grill…

IMG_20130901_153429

Here you can see the second water pan. For some reason I was really afraid of the temperatures getting away from me. With the secondary pan it probably turned the inside of the grill into a sauna instead of a moist environment.
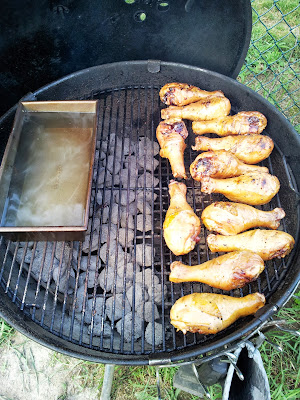
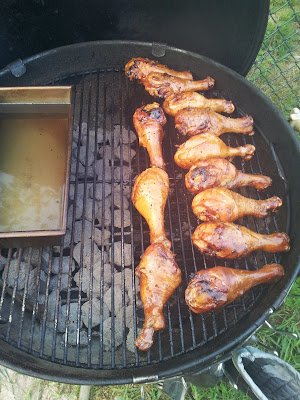
IMG_20130901_181429

3 hours later…

IMG_20130901_183816

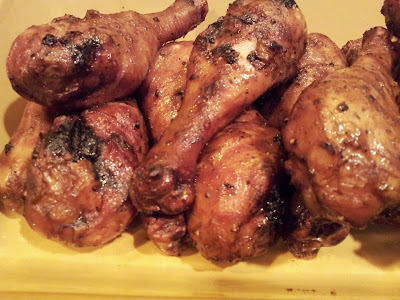
Bird pulled off the grill and sitting in a tray on its way to the kitchen.

IMG_20130901_184003

Another shot of the bird close up…

IMG_20130901_194043

Event though I wasn’t too fond of it, this is what we did to that bird in one night! The rest were leftovers I took to work the entire week.

Hong Kong Chicken

I picked this recipe from Weber’s Charcoal Grilling: The Art of Cooking with Live Fire last week, because I wanted something on the grill, but didn’t feel like going out to the store to pick anything up. So I defrosted some chicken legs the night before and set to preparing this. This is a relatively quick recipe to prepare for. Total time from unwrapping thawed legs to plate was about 5.5 hours. The majority of that time (4 hours) was the brine time for the chicken legs.

Let’s move on to the cook!

Dry Ingredients Wet Ingredients

Seasoning Blend:

2 tsp. Kosher salt

1 tsp. fresh ground black pepper

Brine:
2 qts water
1/2 cp. Kosher salt
1/2 cp. sugar

Grill Sauce:
2 tbsp. Hoisin Sauce
2 tbsp. Cider Vinegar
1 tbsp. Dijon mustard
2 tsp. Soy sauce
2 tsp. grape seed oil
1/4 tsp. fresh ground black pepper

This cook, is brought to you by Bacardi White

Step 1: Brine the chicken for 4 hours in the brine mixture and place in the fridge.

Step 2: Remove chicken from brine, rinse off, and pat dry with paper towels. Then liberally season with seasoning blend.

Step 3:

Set up a medium heat grill. I used 3/4 of a Weber chimney full of Kingsford coals. I filled one Weber basket with lit coals, and then poured the rest to cover half the charcoal grate. (see below)

Step 4: Place chicken directly over coals for a 5 minute char to get the drumsticks started. (2.5 minutes on one side, then 2.5 minutes on the other)

Step 6: Move to cool side of grill

Step 7: After 20 minutes

Step 8: After 40 minutes

Step 9: At 40 minutes, apply sauce to chicken and put the lid to cook for an additional 20 minutes

Step 10: Last 20 minutes

Step 11: Pull and let rest for 15 minutes. I made some sautéed vegetables and brown rice with a Moscow Mule. Excellent! Chicken had a bit of heat to it, a little too much for the kids, but me and the wife loved it!

Blackened Tilapia

P1010530

I love Cajun food, particularly Blackened Redfish, but since I didn’t have any Redfish, I substituted Tilapia. I made these the same time as I made my Cedar Planked Lemon-Pepper Tilapia. As before, I had this bag of Tilapia just sitting in the freezer, so I figured I’d do something with it.

The raw materials…

I split the bag in half. I blackened 6 fillets and cedar planked the other 6.

P1010498

I used a variation of a recipe from Terry Thompson’s The New Cajun-Creole Cooking cookbook. Here is the recipe I used to “paint” the fillets.

Dry Ingredients “Wet Ingredients”
  • 1 tbsp. Paprika
  • 1.5 tsp. cayenne pepper
  • 1 tsp. kosher salt
  • 2 tsp. black pepper
  • 1 tbsp. dried thyme
  • 6 Tilapia fillets
  • 2 cups butter melted
  • 1/2 cup lemon juice (fresh squeezed, never the stuff from the plastic lemons, EVER!)

I melted the butter in the microwave on low heat, then stirred in all the rest of the ingredients and allowed the mixture to cool. Once cool I painted each fillet on both sides with the mixture and let it marinate for about 3 hours.

Painting the fillets…

P1010514

While the fillets were marinating I started a full chimney of Kingsford briquettes. I used half of the lit coals to fill a Weber basket, and the rest I spread in a single layer to toast cedar plank for the other fish I cooked.

Lighting the coals…

P1010492

Laying ‘em down…

I let the cast iron griddle heat for about 15 minutes over the weber basket. You’ll know when your griddle/skillet is ready, because the cast iron will get a bit of a gray haze on it.

As soon as you put the fillets on they will produce prodigious amounts of smoke. They will sear and begin to cook immediately. Be careful that the spits and sputters from the fish and butter don’t burn you. You may be tempted to lift the fillets or move them. DON’T! You will touch this only once, when you flip it over. It took these about 3 minutes per side.

P1010525

The finished product…

P1010530

These tasted as good as they look. One fillet never made it in the house. I brought out a fork and plate and ate it there at the grill.

Lessons Learned/For next time…

The Tilapia was a little too tender for this recipe. A couple of fillets got mangled in the turning. In addition, the weather was cold that day so I had to watch the heat on the second round of fillets. I can’t wait to try this with some Redfish or Red Snapper next time!

Crunchy Grilled Chicken Breasts

IMG_20121007_140655

Tell me these don’t look good, I dare you! Just kidding. Smile

It is possible to make crunchy and grilled chicken breast at the same time on the grill. This isn’t KFC styled crunchy but there’s a good bit of attitude in each bite of these. This cook is a variation of a recipe in  Bill and Cheryl Jamison’s Chicken on the Grill: 100 Surefire Ways to Grill Perfect Chicken Every Time

Today in NE Philly

P1010414

As you can see the sky was grey and drizzly, a dreary Sunday afternoon brewing up. Plus, the weather was under 60 degrees so you know what that means, Summer has officially left the building. Doesn’t mean I can’t grill though.

Today’s cast:

P1010405

Dry Ingredients Wet Ingredients (Basting blend)
  • 4 tbsp raw rice (ground to consistency of bread crumbs)
  • 2 tbsp paprika
  • 2 tsp kosher salt
  • 1 tsp brown sugar (always homemade!)
  • 1 tsp onion powder
  • 1/4 cup EVOO
  • 1/4 cup unsalted butter melted
  • 1/4 cup roughly chopped fresh herbs (Basil, Oregano, Marjoram, etc)
  • 5 cloves crushed garlic

Grinding the Rice

P1010406

At first I tried my tried and true Cuisinart food processor. But after a minute or so of pulsing this is what the rice looked like. I was not looking forward to digging out my marble mortar and pestle. So I got down my Oster blender. Here’s a shot of it grinding away. Look at that rice fly!

P1010407

Ground rice anyone? As you can see it is ground to about the texture of bread crumbs. The blender really made short work of the rice. If I had left it on for much longer I probably would have had rice flour.

P1010408

The resultant rub:

P1010409

It’s Hammer Time! I hate pounding chicken breasts. One tip I’ve found is to use a freezer bag for the chicken breasts and whack them while inside. The freezer bag is a lot easier to get chicken in and out of then Saran Wrap.

P1010410

…and Rubbin’ son, is Racing!

P1010413

I’ve given each breast a liberal coating of the rub. They will go in the fridge for 3 –4 hours as I get some other things done today.

4 Hours later…

P1010415

I’ve got my trusted Half-Moon Griddle on my Weber One-Touch-Gold. I only lit a 3/4 full chimney. Knowing how fast breasts cooks I didn’t need a full chimney today. Plus I wasn’t going to cook anything else after this. Underneath the griddle is a weber basket full of coals. The rest of the chimney was spread out halfway across the charcoal grate.

3 minutes per side…

P1010416

I cooked each breast three minutes per side. As soon as I flipped, I brushed on the basting marinade on top of the sizzling meat. As soon as 6 minutes had passed I moved the breasts off to the cool side of the grill as I cooked the other breasts.

Basting Beauties…

P1010417

Here you can see my phone playing double duty as a timer for the breasts.  I can get a bit anal about these things sometimes. The basil baste is in the center of the photo.

A group shot…

P1010418

Last of the chicken breasts going on the griddle. You can see some of the herbs on some of the other pieces. One of these breasts never made if off the grill and into the house. He sacrificed himself by jumping straight into my mouth!

The heat is on…

P1010419

Once all the breasts had their 6 minutes of fun, they went back over the hot coals for 3 more minutes. I basted and flipped after about a minute each side. The smell of the baste on top of the sizzling meat chased the Autumn away.

The Money Shot…

IMG_20121007_140702

The chicken came out great. The ground rice in the rub was a nice surprise. It gave the breasts a bit of a bite as you bit into them. Almost like coarse sea salt but without the salty taste. Next time I make this rub I make increase the amount of ground rice a bit. But overall I’m very satisfied with this outing.

Butterflied Smoked Chicken

For this cook, I am started with a standard Perdue fryer. I need to find a good Amish butcher so I can get some organic free range birds to play around with. My local grocer stopped selling organic Kosher so I have been using Perdue birds.

IMG_20120901_213159

Here you see I’ve cut through the back of the chicken to one side of the backbone. When I butterfly I usually leave the backbone in, vs cutting it out. There is some decent flavor that gets missed when you pull the backbone out.

IMG_20120901_213443

Here the bird is flipped over and you can see where I left in the backbone on the left side. Next step is removing the keel. Which I will show in the next shot.

IMG_20120901_213511

After spreading the two halves of the bird, I position a sharp chef’s knife against the upper edge of the keel as in below. Using a slight cutting motion the blade will cut a small indentation into the bone. Once done, spread the bird with slight pressure and the breastbone will split. Then run your finger along the underside and pull the whole thing out in one shot.

IMG_20120901_213534

Here is a picture of the bird after the center breast bone has been pulled out.

IMG_20120901_213723

I flipped the bird over and cut two small slits in the lower part of the breast halves to tuck the drumsticks in as in the below picture. I season with rub with the drumsticks untucked then tuck them back in before I place on the grill.

IMG_20120901_213848

Applying some rub. My basic recipe is as follows:

Wet Ingredients Dry Ingredients
  • Rinse bird with water (dry with paper towels)
  • sprinkle with 2 tbsp lemon juice lightly rub all over bird
  • 4 tbsp kosher salt
  • 2 tbsp paprika
  • 2 tsp dried chipotle pepper
  • 2 tsp brown sugar
  • 2 tsp garlic powder
  • 1 tsp celery seed
  • 1 tsp ground cumin
  • 1 tsp black pepper

IMG_20120901_214324

Going on the grill with some spare thighs I had leftover from an earlier cook.

IMG_20120902_162250

Not too bad if I do say so myself. I pulled the thighs off earlier than the butterflied bird as they were finished sooner.

IMG_20120902_182659

Basil & Garlic Pork Tenderloins–Part I, the prep…

It is my firm opinion that every grill cook needs a supportive beverage. Preferably one with some alcohol in it. For this prep session I’ll be turning to an old favorite, Sam Adams Octoberfest.

Step 1: The Beer

IMG_20120922_191005

Step 2: Ingredients (Wet and Dry)

IMG_20120922_184403_small

This recipe is based upon a recipe from Adam Perry Lang’s BBQ25 cookbook. I revised it a bit using the fresh basil growing my garden in front of my house. There is nothing like using fresh herbs. Just bringing the basil in doors filled my downstairs with its smell. Here are the list of ingredients for the brine/marinade

Dry Ingredients Wet Ingredients
  • 3 tbsp kosher salt
  • 3 tbsp brown sugar (homemade)
  • 1 tsp blk pepper
  • 1 tsp Old Bay Seasoning
  • 1 tbsp onion powder
  • 1 tbsp dried crushed Aleppo Peppers (Williams-Sonoma
  • 1 bulb garlic
  • 1 bunch fresh basil
  • 6 cps cold water

Step 3: Making the Brine/Marinade

I guess this mixture is more a marinade than a straight brine. But  I guess it is functioning as a bit of both since it has kosher salt and brown sugar. Do yourself a favor and use fresh herbs and brown sugar. The payoff is worth it. After all, you will be eating this. In the picture below I’ve minced the garlic (peeled) and basil in my food processor. In the other container I’ve mixed the dry spices.

IMG_20120922_185536_small


Step 4: The tenderloins

My wife picked up this pack of pork tenderloins at our local Giant Supermarket. I was originally going to cook Bone-in Pork Loin Roasts, but these were on sale. As you can see, I was accommodating.

IMG_20120922_190406_small

Step 5 – Brining/Marinading

Here you see two tenderloins in a 1 Gallon ziploc freezer bag. I split the resultant mixture in half and poured it over the tenderloins in both bags. I plan on marinading these overnight and cooking them tomorrow. I’ll be back with the second half of this post after I cook these.

IMG_20120922_190709_small